Adding Fabric to a Folding Chair Set

I have a fun little DIY project that cost me less than $100, took about an hour and has put a smile on my face for a couple days. Oh yeah, and it was SUPER easy.  Interested?

It all started because we’re having family over this coming weekend for Jack’s very exciting FIRST birthday. No, I’m not going all crazy with pinterest-inspired decorations and food. I’m keeping it easy (and keeping my stress level’s down) by having an easy menu of pizza, salad and cake. Yum, right?

For decorations I did a cute little Valentine’s Day garland in our den and bought a package of party decorations that I may use in the kitchen. Oh, and I got a 1st Birthday hat for Jack, because it is so darn adorable I couldn’t resist.

What I DIDN’T have was enough seating for our guests.

Even with just our close family (not including a sister-in-law’s family and my two sisters who are unable to come), we’re expecting 15 people. Our kitchen table fits 8 people when it’s expanded… so unless we’re going to take turns sitting I had to figure out some extra seating.

I have a nice wooden folding table and chairs set from World Market (purchased probably 10 years ago) that I can use for 2 or 3 people. Probably the kids since the chairs are made for mini butts and not full size grown-ass men. So, that helped but didn’t totally solve my problem.

I checked Target, Home Depot, Costco and Amazon before I settled on this folding table and chairs set from Walmart for just $56.83. A FIVE piece set for less than $60 is the way to my heart and a total steal!

So cheap!
So functional!
So… boring.
It was REALLY boring.
OH SO VERY boring.

So, I snazzed it up with my Easy Peasy Folding Chair Makeover:

IMG_1615
Oh look, so functional but so BLAH!
IMG_1616
First, you remove the seat from the chair with the help of a handy, dandy screwdriver.
IMG_1617
Decide which direction you’d like the fabric to go and cut it so there is a couple inches left on each side of your seat.
IMG_1618
Normally I would use my staple gun to secure the fabric to the seat. However, these seats are pretty thin and I didn’t want a butt full of staples every time I sat down. Bring on the duct tape! Pull the fabric nice and tight and tape it down on each side.
IMG_1619
Finish with one more application of duct tape to make sure everything stays where it is AND make it look a little prettier in case someone checks out the underside of your chair.
IMG_1625
Attached the seat back to the chair and you’re done! Super quick and how freaking cute is that chair?!
IMG_1621
Oh wait, you don’t want cute? How about ROMANTIC — check out these babies in front of a roaring fire with a pretty vase of flowers. BaZING!
IMG_1626
These bad boys are even sassy folded up and stored out of the way. I think I’m in looooove!

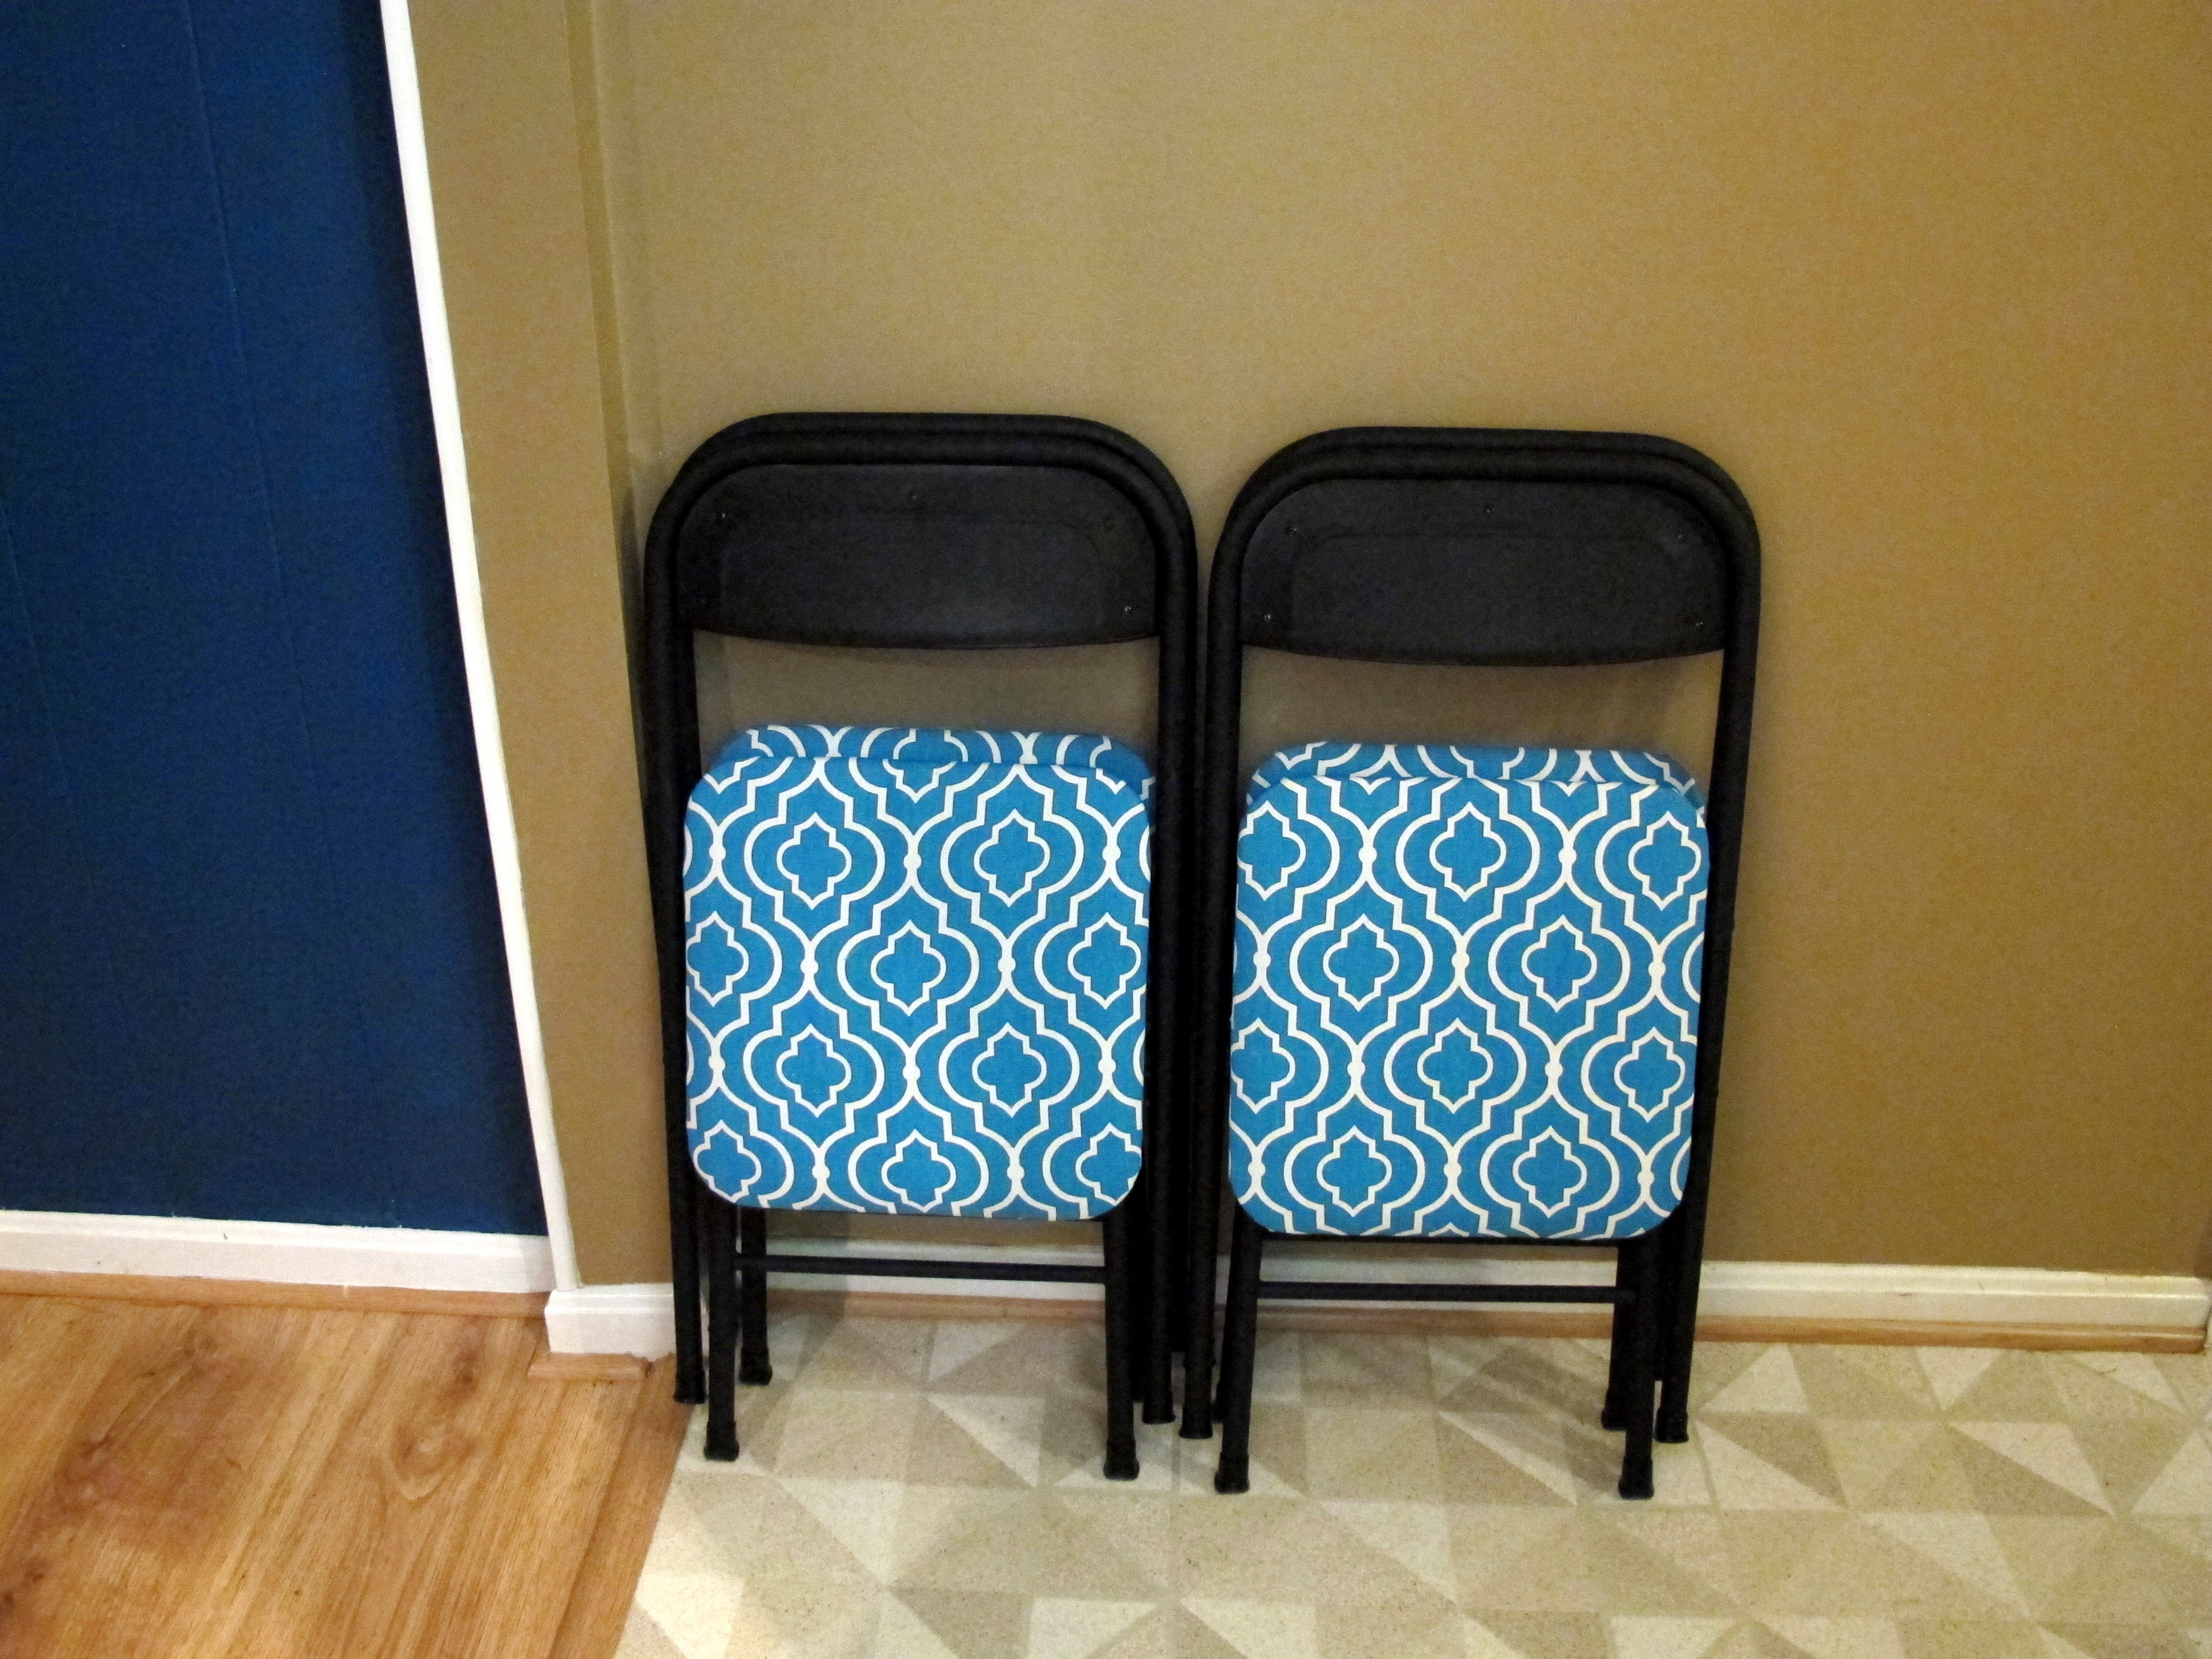
Here’s my cost breakdown:

Folding table and chairs set: $56.83
Fabric from Joann’s with a 40% discount: $5.99
Duct tape: $3.37
Total: $66.19!

Tell me, have you been DIYing any fun projects at your house this month? If you blogged about it, you are invited to share the links in the comments below (since I invited you, you totally won’t be a BlogHole).

Don’t Cha Wish Your Pantry Was Neat Like Me

Um, can you tell I’ve been rocking out to my Britney Spears station on Pandora again? I was totally going to call this post Pantry Porn, but then I got worried about the weirdo pervs who might find this post while looking for some boobies in a pantry so I changed it to a play on Don’t Cha from the Pussycat Dolls. Which I guess didn’t really work, but oh well.

Here’s a refresher if you haven’t heard the song in a while. Oh, and be warned… you’re totally going to wish that you hadn’t just eaten a piece of pizza and immediately make plans to do some situps. Oh, just me? Hmm…

Who wants to play a sassy version of musical chairs now? Anyways, now that we’re all dropping it like it’s hot* and swinging our hair around, let’s get to the pantry brewhaha.

I mentioned that one of my goals over the holiday was to finally turn my mess of a pantry into something so organized that it would make me swoon.

Here are my “before” shots. No swooning here:

before - full pantry
Here it is in all it’s “before” glory. Our pantry holds all my baking stuff, snacks, party stuff, and oh yeah… dog food.
before - baking stuff
Here’s a close up of my baking ingredients. Every time I pulled out the flour I ended up covered in it. We’re super lucky that we didn’t end up with bugs anywhere!

I spent about $100 total at The Container Store and ordered a can rack, 2 double cabinet shelves, a tiered spice organizer, 2 party tubs, containers for sugar and flour, and some shelf liner.

I was actually quite impressed with everyone I ordered… except for the can rack. You are supposed to be able to put your canned veggies and soups on the rack for easy access, but it was kind of a pain in the butt to get things on and off the rack. I’m kind of lazy though, so instead of returning it I repurposed it to hold my hot chocolate and cider packets.

Here’s my after shots. Oooh… Ahhhhh..

after - full pantry
Here’s the “after” shot. So nice and neat and PRETTY!
after- spices
Check out those baking ingredients! You can actually SEE what’s going on. I also LOVE the flour and sugar containers, they’re designed so you can just put the whole bag inside!
after - snacks area
Yeah, check out the snacks on that shelf. (Does that sound dirty? Darn, I really am going to end up with perverts on my website… again).
after - party stuff and wine
I used the cute bins to keep stuff together, like everything I need for a party — plates, plastic ware, napkins, straws, etc. And yes, that’s Mommy’s Time Out wine… a gift from a friend that I haven’t cracked open yet.
after - can rack
This is the can rack that didn’t work so well for cans. It did a pretty good job with my hot chocolate, cider packets and assortment of chocolate chips though!

I completed this project about a month or so ago and I have to say that if you looked in my pantry today it looks almost exactly like these pictures. So yay for pantry organizing!

Have you done any organizing projects lately? Would I swoon if I looked your pantry? Have you created a cheesy dance-mix station to keep you PUMPED on a long work day?


* I randomly clicked over to the post where I talked about my pantry plans and saw that I wrote, “Break out the dance music because there is going to be a pantry organizing party up on my hizhouse this weekend! BOOYA.” I’m not really sure why pantry organizing makes me want to dance like a Pussycat Doll, but at least I’m consistent with my dancing feelings.

Feeling Smurfy

My blue finger

Those of you who follow me on Facebook already got a little preview of this project. Well, not so much the actual project – more like what happened to my finger while doing this project.

I’ve been working on my master bedroom update for awhile and have been collecting new stuff for the room over the past few months – new duvet cover, a pretty quilt, curtains, a new trunk for the end of the bed, blah blah blah. Well, all these thing cost money and I was starting to feel like this project was adding up to WAY more than I wanted (I haven’t actually totaled everything yet, I was just getting that feeling).

So, when I started shopping around for new sheets and realized that I couldn’t find exactly the color I imagined in my head AND they were all super expensive, I decided to get a little crafty.

I already had a pair of flannel sheets that were super worn and comfy, but they were kind of an ugly light green color. I’ve never actually dyed anything before (besides my hair and tye-dying stuff at Girl Scout camp), so I was a bit apprehensive about dying my sheets. It just seemed like a great big pain in the keister while also being quite messy.

I put on my big girl pants and decided to do it and I’m kind of mixed on the results.

First, here’s my step-by-step of what I did:

Step 1: wet the sheets. Hey look, having an ugly green tub comes in handy because I don’t have to worry about staining it!
Step 2: fill plastic container with hot water and add 2 bottles of Rit dye. I used Evening Blue.
Step 3: add wet sheets to container of dye/water and swish them around for 30 minutes. I’m wearing gloves AND used a paint stirrer to swoosh, but I still ended up getting dye on my fingers.
Step 4: yeah, you didn’t really think I was actually going to stir for 30 minutes did you? I stabbed the sheets down with my paint stirrers and wandered away after about 10 minutes.
Step 5: CAREFULLY dump out the dye/water. No splashing around otherwise you’ll dye everything blue!
Step 6: rinse out the sheets over and over again until the water finally runs clear. Once again, I’m kind of lazy, so it wasn’t TOTALLY clear but close enough. I then threw the sheets in the washer and put it through with my normal detergent.
All done — here are the finished sheets after going through the washer and dryer (washed them on cold, but I pretty much wash everything with cold water).

So, yay — I saved money and dyed my own sheets. I kind of half-way followed the directions on the Rit bottle, but looking back I probably should have bought a couple more bottles of dye to throw in there. I really wanted a more vibrant blue color… kind of like the shade of blue they were before I washed all the dye out. Of course, who knows if the sheets would have even sucked in more dye if it had been added.

All in all, I’m not really going to call this little project a “win”, more like a “eh..better than they were before”. In person, they do look like a pretty faded blue, rather than a dumpy pissy green. So, I can’t really complain too much — I spent around $8 and it took less than 30 minutes of my time.

How about you, have you dyed anything instead of buying new?

PS. If you haven’t completed my quick one question survey (and entered to win something AWESOME), please take a minute to click here.