Kitchen Changes, part 2

Doing the happy dance – my additional supplies arrived and I was able to complete the second portion of my kitchen project.

The old boring white backsplash that looked more like a painting mistake

So, what was the hint?

It was a double whammy of the package and the ugly white backsplash walls.

It may appear that I forgot to paint the backsplash area grey like the rest of the kitchen walls, but it was actually a thick white melamine-type of backsplash that had been added by the previous owners.

Check it out in the photo. Useful in keeping spills easily wipeable, but totally boring.

We thought about ripping it out and putting up some tile-work, but it just seemed so permanent. I like to change things around every so often, so I kept holding off on the project because I didn’t want to spend the time and money on something that I might be sick of in a year or so.

Then I heard about a product called Smart Tiles. They sell them at Home Depot and they are basically a super thick, plasticy backsplash. The one I chose looks similar to a mosaic tile wall so I get all that tiley goodness, but could easily switch it out if I get bored.

My package o’ fun contained 4 packs of Smart Tiles

I went back and forth and back again about buying them. They were only sold online, so I had to depend on the reviews (found by typing Smart Tiles Reviews in google, as well as on the Home Depot website) to determine how they would look in person. I found the reviews with actual user pictures of their completed projects the most useful. Even though some people loved them and some hated them, I decided to give it a shot and placed the order.

A couple days later my friendly UPS man dropped them off. The directions on the package were super simple – basically, open package and stick on wall. However, I found a couple online tutorials that I found much more helpful. Here’s one and here’s another.

Of course, right when I wanted to start it was baby feeding time – so I fed Jack a bottle and sent him into a milk stupor/nap.

Jack is very helpful in completing my home improvement projects…

Once he was down I ripped open the tiles and got to work.

It wasn’t too difficult to apply and the melamine backsplash actually made it pretty easy to unstick and restick a sheet if I made a mistake.  Once the sheet of tile is on the wall, it’s stuck there really well (in fact, the directions say to remove it you’d use a hairdryer). It does take a degree of concentration to make sure that every piece is applied perfectly. You also need to have mad skillz with a razor knife because it is necessary to cut single strips and even single tiles to fill in some tricky areas. All in all, on a difficult scale of 1 – 5, I’d give it about a 3.

A few hours and baby feedings/dance breaks/diaper changes later and I was almost done. Um, note I said ALMOST done… I had miscalculated the amount of tiles I’d need so I had to order one more pack. Super annoying since I like to just knock a project out and move on to the next thing.

Anyways, as I said at the beginning of the post, the package came! I finished the project pretty quickly and am happy to be able to share the results.

Close up of the same angle as the first picture with the ugly white backsplash — such an improvement!

So, would I recommend Smart Tiles? I’d have to say that I would. They definitely were not cheap, but it was relatively easy to install the tile sheets and I absolutely love the results. With just the little change of painting the cabinet hardware and adding the backsplash, it really changes the entire look of the kitchen.

Remember what it looked like earlier this week:

Ugly gold hardware and boring white backsplash
After its snazzy makeover!

I still have a couple more things to do before I can call the kitchen complete (mainly buying a new dishwasher and oven), but it feels a lot more like OUR kitchen now and I love it!

2022 Update: I decided to switch out the peel-and-stick backsplash and I’m happy to report that with a little hairdryer heat and some diligent pulling, it all came off easy-peasy!

Like what you see? Share me with your friends!

Kitchen Change, part 1

One of the things that annoys me most on episodes of House Hunters (to which I’m hopelessly addicted), is when someone walks into an otherwise perfect house and complains about the stupid stuff. If I hear, “Oh, I just couldn’t live with this paint color” one more time, I’m going to throw something at the TV. Same goes for a woman looking into a huge walk-in closet and saying, “This works for me, but where are you going to put YOUR stuff?! {insert awkward chuckle here}.” Oh yeah, and any couple EVER talking about a man cave. Blegh.

Anyways, back to the point – easy changes.

One of the things that I totally hated about our kitchen when I first saw it was the cabinet hardware:

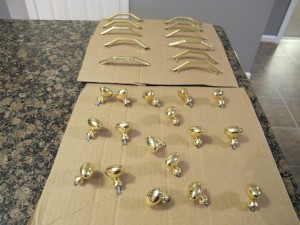
A full view of all the golden goodness.

The cabinets are fine, the granite countertops fantastic and the layout is perfect (now that we moved the island).

A close up view — it’s like a tacky gold chain around a slimy guys neck, right?!

But I just couldn’t deal with the gold/brass hardware knobs and drawer pulls. I’m not a big fan of gold in general, and the cabinets looked like King Midas came over and molested them. And honestly, nobody wants to be molested by King Midas.

It would be such a shame to trash it all though, because it was really nice heavy stuff and I even liked the shape of the knobs. Since I hate wasting something that is perfectly good (and spending money when I don’t have to), I decided to change their color.

YHL did a great tutorial of it over the summer here, so I decided to try it out. I’m kind of lazy though, so I knocked out a couple of steps.

First, I grabbed my handy screwdriver and removed all of the knobs and drawer pulls throughout the kitchen. While opening each cabinet and drawer to remove stuff, I found the wine I had put away when I was pregnant. YAY, wine — just what I need to complete this project!

Bling bling baby!

So I filled myself a glass of wine and moved the next stage – poking holes in an old piece of cardboard and sticking all the knobs and drawer pulls through it. As I poked each screw through the cardboard and threaded the knob on, I made sure to only tighten it halfway. This way I can shift everything back and forth in between painting coats to ensure I don’t miss any spots.

Once all the knobs were connected to the cardboard, I grabbed my trusty Windex and a paper towel. I cleaned the yuck off of each knob and also cleaned the front of each cabinet so that there was no goo left when I went to return them to their original positions. At this point I was supposed to use a deglosser on the knobs, but I read the warnings on the back of the bottle and freaked out about how toxic it was, so I decided to skip that step.

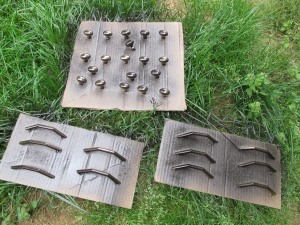
First coat — a little less “bling” and a little more “heck yeah”

The next phase of the project was to get out my snazzy spray paint – like YHL, I used Rustolium’s oil rubbed bronze primer and paint in one. I took my three pieces of cardboard outside and sprayed the first super thin coat on everything. Oh, and don’t worry it always looks pretty terrible at first.

I let the first coat dry and then went back about 20 – 30 minutes later for a second coat. And then 20 – 30 minutes after that for a third coat and so on and so on. After a couple coats started getting good coverage, I flipped the knobs down so that the other sides were visible for painting. And then I sprayed yet another coat.

I probably applied about 4 coats, waiting for them to dry between each one, before I was happy with the finished product. And then I applied one last coat to make sure I didn’t miss any spots. There is nothing worse than finishing a project, cleaning up and then realizing that you needed to get all your supplies out again to do one more thing.

Ooohhhh. Ahhhhh.

Once that last coat was done, I left the finished knobs outside for the rest of the day so that they could fully dry. I brought them in at night and left them in the sunroom that night and for the whole next day while I was at work.

And they looked GORGEOUS! Well, as gorgeous as some knobs can look.*

I put them back on the cabinets and admired my handiwork. Well, actually this part didn’t go quite as smoothly as I would have liked.

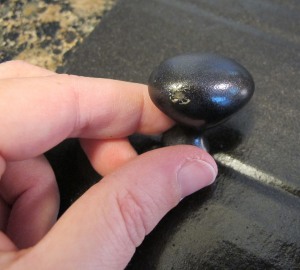
Ooopsie!

Even though the freshly painted knobs passed the scratch test with my fingernail, I accidently dropped two of them on the granite countertop and it smashed the paint right off of them {insert sad trombone noise here}. No big deal though, I just stuck those two knobs back through the painted cardboard and give them one more coat of paint so they look just as good as their little knobby friends.

Check out the before and after – much better, right? For just $6 worth of spray paint it’s a HUGE improvement. Actually, let’s call it a medium-sized improvement because this is just part 1 of my kitchen changes for the week.

I worked on part 2 all day yesterday and I can’t wait to unveil it here (hopefully) tomorrow. I would have been able to post about it today, but I miscalculated and ran out of supplies before the project was finished {insert grumbling and cursing here}.

Here’s a little hint though…

{Insert end of blog post}

Ps. I’m really liking {inserting things} today.

{insert groan because you’ve just realized that I am a massive dork}

*Does that sound dirty to you? Because it totally sounds dirty to me and I’m kind of snickering at that sentence…

Like what you see? Share me with your friends!

I’m Kind of in Love with an Organized Closet

I’ve never had one of those huge walk-in closets. I’ve always wanted one, but have never been lucky enough to have one of my own. It’s probably a good thing though, because I wouldn’t know what to do with all that space and would probably just have a ton of clothes that I don’t wear crowding along the racks.

In our townhouse, I had a closet in my bedroom AND a closet in the office.  So, I’d have all of my current season clothes in my room and all of the off-season stuff put away in the office closet. Now that we’ve moved, I’m back to having one closet. I could take over a closet in another room, but I’d rather just cut the clutter and become a bit more organized.

So if you’d like to join me, here are my tips to spring cleaning your closet:

Here’s my insane amount of boxes of off-season clothes. What’s funny is that I pretty much wear the same thing every day.

Take Everything Out of Your Closet & Drawers and Throw it on your Bed
And I mean everything – underwear, socks, t-shirts, jeans, work clothes… the whole kit and kaboodle (or kitten kaboodle if you’re a cat person). Then, I go and get my off-season bins of clothes and dump them on the bed too.

Spreading everything out into a great heap of mess does a couple things for you. First, if you’re like me you’ll look at the shear mass of crap you own and decide to get rid of a lot of it. Second, it makes it easier to get rid of stuff when it’s already thrown on your bed in a pile.

Take a Deep Breath and Get Ready to Purge              
Okay, now is where I usually bring in a trash bag and a couple of empty boxes. I also have the now empty off-season clothes bins to put things into for the next season.

Start Sorting
For each piece of clothing, you need to decide whether to keep it, throw it away, or donate it.

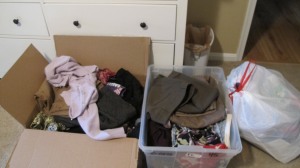
I ended up with two big boxes of clothes to donate and one bag of trash.

Ask yourself:

  • Is it in good condition?
  • Does it fit?
  • Does it look good on me?
  • Have I worn it within the last 2 years?

If the clothing passes the test, put it either in your drawer/closet for current season stuff, or in a labeled bin for off-season stuff. If it doesn’t pass the test then it goes immediately into the donation pile or trash bag.

Pat Yourself on the Back & Immediately Go to Goodwill
Yay, you’re done! Great job, you totally rock and now you’ll be able to reach into your closet and grab clothes that you will actually wear! Take all the plastic bins of off-season clothes and shove them under your bed or in another room’s closet.

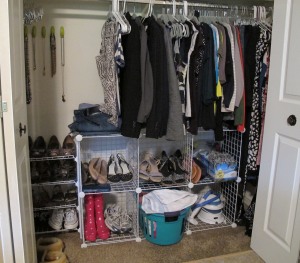
Ahhh, an organized closet feels so good!

For the boxes of clothes that you’ve decided to donate – make a quick list of what each box contains so that you’ll be able to get a receipt back for your taxes. Then, load the boxes into your car and immediately take them to Goodwill, The Salvation Army, or your choice of places to donate them.

Trust me – DON’T WAIT and do it now. Otherwise, you’ll think it’s a good idea to go back through the box and pull stuff out that you’ve already decided to get rid of!

Like what you see? Share me with your friends!